


Imagine converting a typical 400-square-foot garage into a living suite with a dedicated bathroom and small kitchen. You’ll start by evaluating structure, moisture, and permits, then map a layout that preserves headroom and flow. Plan insulation, vapor barriers, lighting, and climate control—choices that pay off in comfort and durability. As you draft budgets and timelines, you’ll uncover hidden costs and trade-offs that shape every finish and fixture, and that realization will push you to the next critical step.
Before You Start: Planning Your Garage Conversion
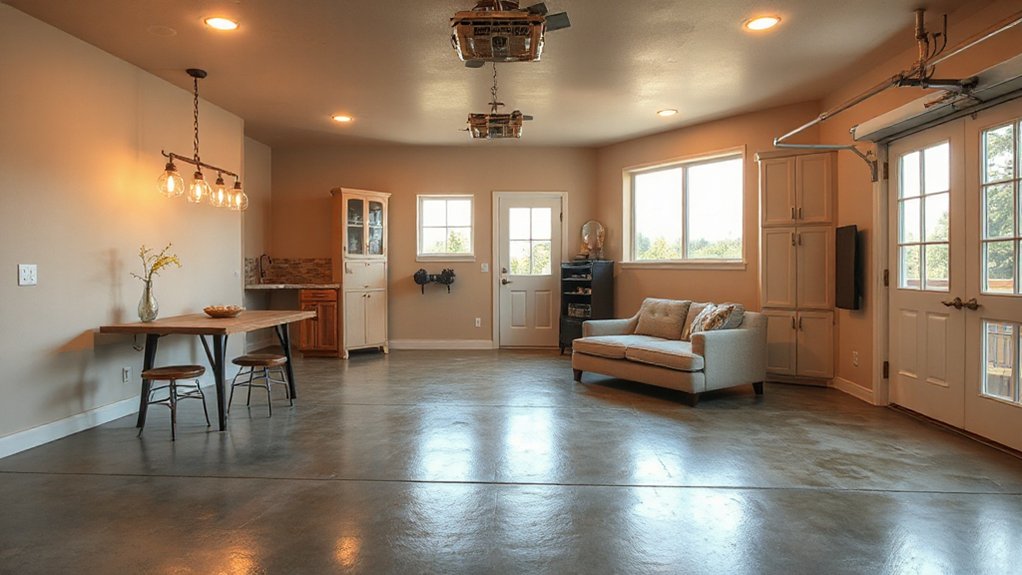
Before you start, map out exactly what you want from the space and what it will require. You’ll define purpose, layout, and budget, then translate those into a concrete checklist.
Start with the everyday rhythm: where will you sleep, relax, cook, and work? Measure dimensions, doorways, and ceiling height to spot constraints early.
Prioritize functionality over trends, but plan for aesthetics too. Consider Garage aesthetics from the ground up—insulation, moisture barriers, lighting, and outlets that support your activities.
Decide on color schemes that influence mood and perceived space size, pairing neutrals with purposeful accents.
Create a phased timeline to avoid scope creep, and identify non-negotiables versus nice-to-haves.
Document decisions, measurements, and costs, then revisit them as you refine the design. You’ll reduce risk and accelerate progress.
Feasibility, Codes, Permits, and Insurance
You’ll quickly assess whether your garage is a viable space by checking foundation, insulation, and existing structure for load, height, and moisture.
Then you’ll map out the codes and permits you’ll need, from zoning and electrical to fire safety, and confirm insurance implications before you start.
Keep your plan concrete: note required inspections, potential waivers, and a clear timeline to avoid costly delays.
Feasibility Considerations
Feasibility is where many garage conversions stall, so start by checking what’s required to make the project legal and insurable. You’ll verify structural viability, insulation needs, and exit options without overreaching your budget.
Assess whether utilities can be extended safely and cost-effectively, and confirm fire-rated assemblies if you’ll add walls or ceilings. Budget time for a clear air and moisture plan to prevent future issues.
Insurance implications matter too: disclose the conversion, document added value, and adjust coverage accordingly.
As you scope finishes, think about garage aesthetics and paint color choices that align with your living space while staying within code-friendly limits.
Prioritize documentation, contractor qualifications, and a realistic timeline to reduce back-and-forth and keep the project moving.
Codes And Permits
- Confirm zoning and setbacks, and map out egress, insulation, and fire-rated assemblies.
- Prepare scope, drawings, and calculations for permits; budget for fees and impact on timelines.
- Align electrical, HVAC, and plumbing with code-mandated clearances and safety standards.
- Consider ongoing Garage organization and exterior aesthetics to maintain curb appeal.
These steps keep projects compliant, resilient, and ready for occupancy.
Garage Conversion Budget: What It Really Costs
A garage conversion can be a smart investment, but the real cost isn’t just the sticker price—it’s a combination of permits, insulation, electrical, plumbing, and finish-work that adds up quickly. You’ll want a realistic budget that captures all phases, from demolition to final inspection.
Start with a solid estimate for insulation, drywall, windows, and HVAC tie-ins, then add electrical and plumbing rough-ins, plus lighting and outlet needs. Don’t overlook permits, inspection fees, and contingency funds for unexpected fixes.
Plan costs around your material selection and intended use, balancing quality with value. For Garage aesthetics, prioritize durable finishes you won’t redo soon, and for material selection, favor scalable options that fit your climate and budget.
Track expenses weekly to stay aligned with your goal.
Designing the Space: Layout, Zoning, and Function
When you’re designing a garage conversion, start with a clear plan for layout, zoning, and function that fits your daily life and long-term needs. You’ll map zones for sleeping, living, and storage, then optimize traffic flow and sightlines so activities don’t clash.
Prioritize flexible furniture placement and scalable storage to adapt over time. Use a simple grid to position windows, doors, and utilities, ensuring natural light and safe egress.
Plan decorative accents that unify the space without clutter, and designate a dedicated work nook if needed.
- Define primary zones (sleep, lounge, work) and secondary zones (hobby, guests)
- Choose furniture placement that maximizes open floor area
- Specify storage niches with clear access and minimal overlap
- Select decor accents that harmonize color and texture while staying functional
Insulation, Vapor Barriers, and Climate Control

To keep your garage comfortable and energy-efficient, start with solid insulation, proper vapor barriers, and reliable climate control. You’ll choose insulation materials based on climate, aiming for at least R-13 to R-20 in walls and R-30 to R-60 in ceilings for living spaces.
Seal gaps around doors, windows, and utilities to prevent drafts and moisture intrusion. For vapor barriers, use types appropriate to your climate: in colder areas, place the vapor barrier on the warm side of the wall to minimize condensation. In mixed climates, ensure continuous coverage and seal all joints.
Climate control should be adaptive: a compact mini-split or ductless system offers zoned comfort with minimal heat loss. Prioritize airtight construction, durable materials, and straightforward maintenance.
Electrical, Plumbing, and Safety Upgrades
To start, you’ll verify electrical code compliance and guarantee the panel, outlets, and circuits are sized for livable space use.
Next, you’ll perform plumbing integrity checks for leaks, proper venting, and water heater suitability. Document any upgrades needed.
Finally, you’ll upgrade safety systems—smoke and CO detectors, GFCI protection, and fire-rated wiring paths—to create a compliant, secure living area.
Electrical Code Compliance
- Assess electrical service capacity and required panel upgrades for future loads.
- Define wiring requirements, GFCI protection, and proper conduit routing.
- Plan dedicated circuits for lighting, outlets, and HVAC with appropriate spacings.
- Include arc fault and ground fault protections per code, plus inspection readiness.
Plumbing Integrity Checks
Even if you’ve upgraded electrical, you still need to verify your plumbing’s integrity before converting a garage into living space. Begin with a practical inspection: look for signs of leaks around fixtures, valves, and pipe joints.
Check supply lines under sinks for rust, bulges, or moisture; pressure-test the system to spot hidden weaknesses.
Assess drainage for slow or gurgling drains, which indicate blockages or venting issues.
Inspect the main shutoff and visible piping for corrosion and insulation integrity, replacing any damaged sections before finish work begins.
Verify pipe durability by confirming material suitability for continuous occupancy, especially if you’re extending or rerouting lines.
Document findings, label compromised areas, and address issues promptly to prevent future leaks and costly remodel delays.
Safety System Upgrades
When upgrading safety systems, start by mapping out the entire electrical, plumbing, and venting layout and identifying code requirements for a habitable space. You’ll install reliable, code-compliant circuits, preserve egress, and plan clean routing for cables.
Next, choose integrated safety solutions that fit a living space, then test before finish work. Consider security cameras and alarm systems for real-time monitoring and deterrence. Guarantee proper door alarms, motion sensors, and fire/CO detectors are interconnected with a central panel.
For plumbing, verify leak prevention and proper venting to avoid moisture risk. Keep accessibility in mind for service panels and exits.
Finally, document upgrades with manuals and warranties for future maintenance.
- Map layouts and codes
- Select integrated safety devices
- Test and document
- Plan maintenance and access
Drywall, Flooring, and Finishes That Last
For a garage conversion to feel like real living space, choose drywall, flooring, and finishes that stand up to daily use and moisture. Start with durable drywall options, like moisture-resistant or gypsum-board variants, and finish with a mildew-resistant primer to prevent mold growth.
Select flooring that handles humidity and traffic, such as vinyl plank, ceramic tile, or sealed concrete with a skid-resistant texture. Install a moisture barrier beneath to curb dampness, and guarantee proper expansion gaps around edges.
For finishes, use low-maintenance paints and easy-to-clean coatings. Consider drywall textures that hide seams and scuffs, while keeping rooms bright with reflective finishes.
Tie it together with finishing touches like recessed lighting and water-resistant trim. Prioritize durability, ease of maintenance, and a cohesive look.
Soundproofing and Comfort: Reducing Noise and Drafts

Start with the basics of soundproofing by sealing gaps around doors, windows, and penetrations, so noise doesn’t travel through the shell.
Then implement draft-blocking techniques like weatherstripping, thicker door sweeps, and proper insulation to cut drafts and improve comfort.
Finally, tune the space with comfort-enhancing details such as resilient flooring, acoustic panels, and controlled HVAC to balance quiet, warmth, and air flow.
Soundproofing Fundamentals
Soundproofing fundamentals start with controlling where noise comes from and how it travels. You’ll focus on two pillars: reducing sound transmission and neutralizing airborne noise. Choose materials and layouts that maximize mass, decouple surfaces, and seal gaps.
Practical steps include targeting walls, floors, and ceilings for improved acoustic insulation and introducing discreet noise barriers where needed. Plan for rapid, durable performance with simple, repeatable installations you can trust.
- Identify dominant noise paths and address them with targeted barriers
- Use compatible acoustic insulation and decoupled assemblies
- Seal joints, leaks, and penetrations to stop flanking sound
- Choose finishes that balance aesthetics, durability, and sound control
This approach keeps your space comfortable, quiet, and energy efficient without overcomplicating the build.
Draft-Blocking Techniques
Draft-blocking is about halting drafts at their source and tightening every gap that air can slip through. You’ll start with a quick assessment: identify obvious openings around doors, windows, and utility penetrations, then map where heat leaks occur.
For draft prevention, focus on air sealing with appropriate materials—caulk for gaps, backer rod in larger joints, and weatherstripping on moving edges. Seal attic and garage-to-house interfaces, like shared walls and ceiling accesses, to reduce heat loss and noise transfer.
Insulate any exposed ducts or pipes that pass through cold spaces, and seal electrical outlet boxes with foam gaskets. Prioritize continuous barriers, recheck after shifts in temperature, and redo seals as needed.
Your goal is a tighter, more comfortable space with fewer drafts and improved efficiency.
Comfort-Enhancing Details
To cut noise and chill, start with targeted, practical steps that pair sound control with comfort: seal gaps around doors and windows, upgrade weatherstripping on moving edges, and add acoustic panels or thick curtains where hard surfaces reflect sound.
- Seal door bottoms and frame gaps, then test with a light screen to trap drafts without muffling air flow.
- Install door sweeps and window kits; pair with drafts-stopping caulk for persistent leaks.
- Place soft furnishings and acoustic panels to dampen reflections in key rooms.
Plan artificial lighting and energy efficiency upgrades that don’t add heat load or glare, like dimmable LEDs and task lighting.
This approach keeps rooms quiet, comfortable, and efficient while supporting practical layout choices.
Lighting Plans and Ambience for Living Spaces
Careful lighting matters more than you might think: good layers of light can transform a garage into a comfortable living space. Start with a practical plan: define zones (tasks, relaxing, and gathering) and match fixtures to each.
Prioritize natural lighting where possible, using strategically placed windows or skylights to reduce energy use and improve mood.
For evenings, layer ambient lighting with dimmable overhead fixtures and wall sconces that soften harsh edges.
Add task lighting at desks, reading nooks, and kitchen counters, choosing color-temperature around 2700–3000K for warmth.
Use LED options for efficiency and longevity, with color rendition above 80 for true colors.
Integrate controls—zoned switches or smart dimmers—for easy mood shifts and energy savings.
Finish with a balanced, glare-free layout that guides movement and conversation.
Storage and Smart Space Optimization
After setting up light layers that define zones, let’s lock in storage and smart space strategies that keep the garage livable without feeling cluttered. You’ll prioritize vertical storage, wall rails, and ceiling hooks to free floor space while keeping essentials accessible. Use labeled bins for seasonal items and clear totes for obvious visibility. Implement multi-purpose furniture, like a workbench with integrated drawers, and install a compact stair-step system for small gear.
Regularly reassess workflows to minimize redundancy. Now: a few concrete steps you can take.
- Wall-mounted pegboards with trays and hooks for frequently used tools
- Overhead racks for rarely used gear and sporting equipment
- Stackable bins with transparent fronts for quick inventory
- Sliding shelves inside cabinetry to maximize deep storage
Garage organization and storage solutions align with a tidy, functional space.
Permits, Inspections, and Move-In Readiness

Managing permits and inspections is a practical, step-by-step process that sets your move-in up for success. Before demolition or construction begins, verify local permit requirements, submit plans, and secure approvals to prevent delays.
Schedule inspections at key milestones—rough-in, insulation, electrical, final—and stay ahead by keeping records organized. Prepare a concise, print-ready summary of changes for the inspector to review, including electrical loads and ventilation details.
As you proceed, guarantee safety codes are met and your space remains compliant with egress and fire-rated barriers. When you’re ready to move in, perform a final walkthrough to confirm finishes, ventilation, and moisture control.
Garage organization and Tool storage should be integrated into the finished layout to support long-term usability and upkeep.
Frequently Asked Questions
How Long Does a Garage Conversion Project Typically Take?
Typically, it takes 4–8 weeks, depending on scope and approvals. You’ll plan garage insulation early, secure conversion permits, then complete framing, insulation, drywall, and finishes. You’ll coordinate trades, inspections, and buffer for weather or permit delays.
Can a Garage Conversion Increase Home Insurance Premiums?
Sure, your insurance might rise with a garage conversion, ironically. But you can mitigate it: installGarage insulation, update exterior renovations, and document code-compliant upgrades, reducing risk. You’ll keep premiums predictable while achieving durable, energy-efficient living space.
Do I Need a Structural Engineer for the Conversion?
Yes, you’ll likely need a structural engineer to guarantee framing and transfers are sound. They’ll verify loads, HVAC considerations, and interior insulation efficiency, preventing future issues. You should coordinate, obtain permits, and document all structural recommendations for compliance.
Are All Garages Eligible for Conversion, or Exceptions Apply?
Sure, not all garages qualify—exclusions include structural limits, setbacks, and permits. You’ll need garage insulation and plumbing considerations checked first, then consult professionals to confirm eligibility. Irony aside, plan meticulously, avoid costly mistakes, and adapt accordingly.
What Financing Options Are Available for Garage Conversions?
You can access options like home equity loans, personal loans, and lines of credit, plus potential grants. Check Garage insulation needs and make sure Permitted development rules are met; compare costs, timelines, and lender requirements before proceeding.
Conclusion
As you wrap up, the last meter of drywall goes up, and you feel the build coming alive. The insulation hums, lights glow, and the space finally feels yours. But the real test starts after the permit stamps and inspections—will the HVAC and vapor barriers keep drafts out when winter bites, will storage fit your every need, and will you trust the design you chose under everyday use? Step back, then move forward with confidence. The living space awaits.